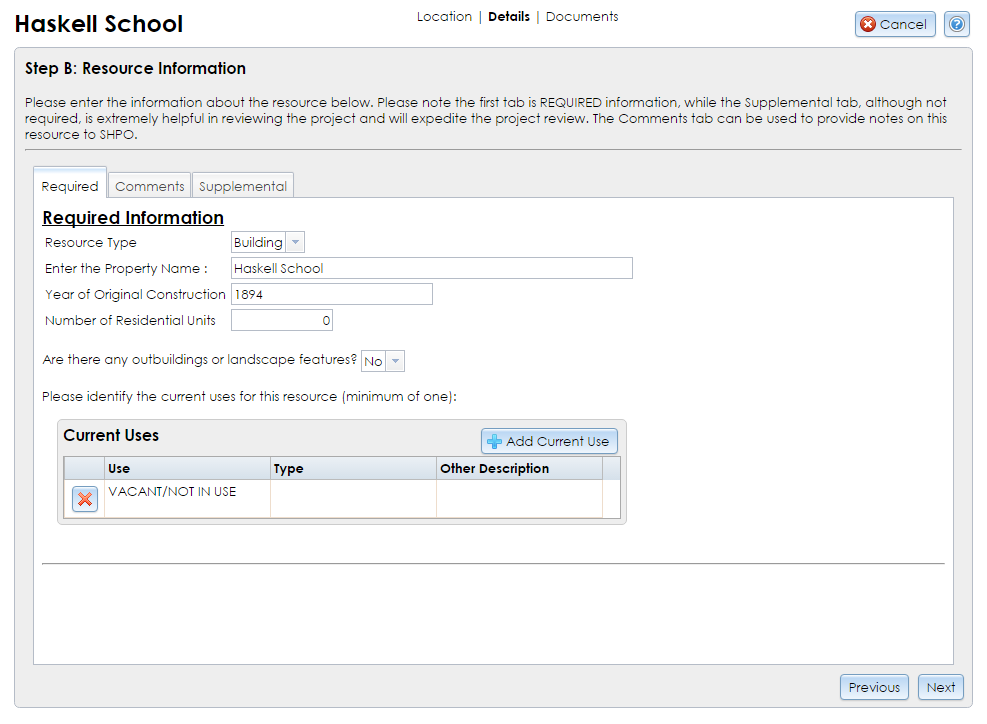
The next step of the Built Resource Wizard allows you to enter characteristics and details about the resource. As shown below, there are three tabs in this step: Required, Comments, and Supplemental.
Required
All fields in this tab are required.
- Resource Type: The subclass of the built resource. Select Building, Structure, Object, or Site. These terms are defined by the National Park Service in Chapter IV of National Register Bulletin 15, How to Apply the National Register Criteria for Evaluation. If you’re unsure, select Building; the SHPO reviewer can revise this if necessary when they process your submitted built resource.
- Enter the Property Name: By default, the address is copied, but if a more specific name is known (such as Susan B. Anthony House or Riverside Cemetery), enter it here.
- Year of Original Construction: The year (exact or approximate) in which the built resource was originally constructed or created. This is a text field, so qualifiers such as circa or a range of dates are permitted, as well as Unknown if you cannot identify the century or decade of construction.
- Number of Residential Units: The exact number of residential units, if applicable. If the resource is not residential, enter 0.
- Contributing to District: This will display only for resources that are within a historic district you are submitting in the District Resource Wizard. Select Yes if the building contributes to the historic significance of the district. If it does not, select No. If you are unsure, select Unknown.
- Are there any outbuildings or landscape features?: This refers to secondary resources such as sheds, garages, and formal gardens. If you select Yes, the Outbuildings grid will display. Click the Add Outbuilding button to select one or more secondary resource types. These will be added to the New Outbuildings grid on the left. For each resource type you select, you must specify the number of outbuildings of that type that are present. If a secondary resource type is not on the list, select Other and enter the resource type. Click the Save button to save the outbuilding(s) or landscape feature(s) to the main resource.
- Current Uses: Click the Add Current Use button to select one or more current uses for the resource. These are defined by the National Park Service in Chapter III, Section 6 of National Register Bulletin 16A, How to Complete the National Register Registration Form. You may use the text field to filter the list. If the use type for the resource is not on the list, select Other and enter the use type. Each use type you select will be added to the New Current Uses grid on the left. Click the Save button to save the current use(s) to the resource record.
This tab is optional. It contains a single text field for adding miscellaneous comments about the resource. These comments are sent to SHPO but are not added to the USN record.
If you are updating this USN in response to a SHPO request, your data will be linked to the USN automatically and you do not need to enter its number here.
You may enter a proposed evaluation of the resource’s eligibility for SHPO’s consideration in this field. If you have any other comments about the resource that do not fit in the Required or Supplemental tabs, you may also enter them here.
Supplemental
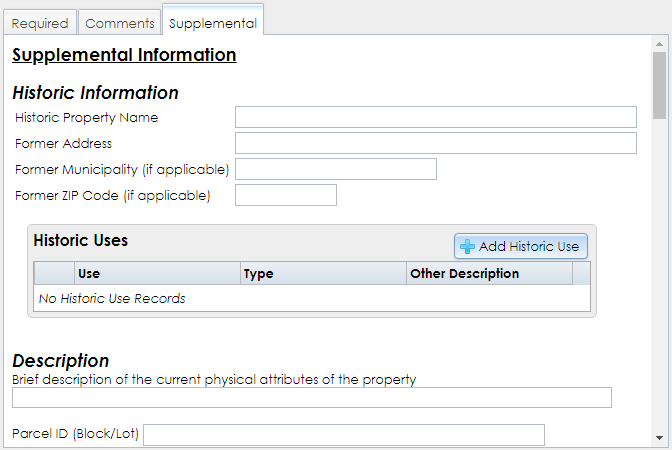
The following fields are not required by the system, but SHPO highly recommends that you enter as much information as possible in this tab. This information will help SHPO evaluate the eligibility of your built resource. It will also make SHPO’s inventory of built resources more easily searchable and more detailed.
For fields that allow you to select or add more than one entry, you may click the red X button to remove an entry.

- Historic Property Name: The name of the resource during its period of historical significance. For example, if a village hall was later repurposed as a library, the name of the village hall would be appropriate in this field.
- Former Address: If the resource was moved from its original location, or if the address changed (such as when the street was renumbered), enter the previous house number and street name.
- Former Municipality: If the resource was moved or the municipality changed, enter the previous municipality name.
- Former ZIP Code: If the ZIP code changed, enter the previous code.
- Historic Uses: Click the Add Historic Use button to select one or more uses for the resource during its period of historic significance. These are defined by the National Park Service in Chapter III, Section 6 of National Register Bulletin 16A, How to Complete the National Register Registration Form. You may use the text field to filter the list. If the use type for the resource is not on the list, select Other and enter the use type. Each use type you select will be added to the New Historic Uses grid on the left. Click the Save button to save the current use(s) to the resource record.
- Brief description of the current physical attributes of the property: Describe the general characteristics of the property, such as its location and setting, type, style, method of construction, size, number of stories, massing, and significant features. Also describe the current condition of the property and indicate whether the property has historic integrity in terms of location, design, setting, materials, workmanship, feeling, and association.
- Parcel ID: The section, block, and lot numbers for the tax parcel(s) occupied by the resource.
- Architecture Classifications: Click the Add Architecture Classification button to select one or more architectural classifications for the resource. These are listed by the National Park Service in Chapter III, Section 7 of National Register Bulletin 16A, How to Complete the National Register Registration Form. You may use the text field to filter the list. If the classification for the resource is not on the list, select Other and enter the classification, or select NO STYLE. Each classification you select will be added to the New Architecture Classifications grid on the left. Click the Save button to save the classification(s) to the resource record.
- Foundation Materials, Wall Materials, Roof Materials, Other Materials: Click the Add (plus sign) button for each of these categories to list the materials that make up the resource’s foundation, walls, roof, or other parts. If the resource does not have a foundation, walls, or roof (such as a monument), enter the materials under Other Materials.
- Major Alterations: If the resource has been significantly altered since its original construction, click the New Alteration button. In the Add a New Alteration dialog, enter a brief description of the alteration (such as Front porch removed) and the exact or approximate alteration date, then click the Save button. You may add more than one alteration.
- Architects/Builders: Enter each architect, firm, or builder in the text field and click the Add (plus sign) button to add each name to the list.
- Brief Description of the Property’s Significance: Enter a summary of the resource’s historic significance, if applicable. Provide the history of the property, particularly as it represents important historic contexts and reflects significant events, associations, and characteristics.
- Sources: Provide a list of any books, articles, maps or other documents that contain information about the district. For each source, please include author, title, place of publication, publisher, and date of publication when known. Include the name and location of repositories for unpublished materials or hard-to-find publications.
- Areas of Significance: Click the Add Area of Significance button to select one or more areas of significance for the resource. These are listed by the National Park Service in Chapter III, Section 8 of National Register Bulletin 16A, How to Complete the National Register Registration Form. You may use the text field to filter the list. If the area of significance for the resource is not on the list, select Other and enter the area of significance. Each area you select will be added to the New Areas of Significance grid on the left. Click the Save button to save the area(s) of significance to the resource record.
- Periods of Significance: Enter each range of years during which historically significant events or activities occurred at or affected the resource. Click the Add (plus sign) button to add each period of significance to the list.
- Significant Dates: If one or more specific dates are significant in the resource’s history, enter each date as text and click the Add (plus sign) button to add each date to the list.
- Significant Persons: If the resource is historically significant due to specific people, such as a former owner or occupant, enter each person and click the Add (plus sign) button to add each person to the list.
- Cultural Affiliations: If the resource is archaeologically or culturally significant, enter each archaeological or ethnographic culture that contributes to the significance of the resource and click the Add (plus sign) button to add each affiliation to the list.
After you have entered the required and supplemental information, click the Next button in the lower right corner to proceed to Step C: Photographs and Attachments. If you wish to return to an earlier step, be sure to click Next to save the current step before clicking Previous to go backward.
Note: If you click the Cancel button in the upper right corner at this step, the information you entered in Step B may not be saved. Proceed to Step C, enter the required information, and click the Done button to save the resource information.


