|
At the end of the Trekker survey, when all data has been collected in the field and submitted to SHPO using Manager, and the survey report has been written and considered “final”, the consultant will need to upload the final survey report within CRIS. The survey report can be uploaded as one or more attachments in CRIS as described below.
When the Trekker Survey Proposal was originally approved by SHPO, an email was sent to the consultant indicating that the survey proposal was approved and a new CRIS survey record (SR) was created. That email ALSO CONTAINED a request for information for the final survey report to be used at a later date. This can now be processed either by clicking the link in the email, or from the "Information Requests" tab within CRIS. The “Information Requests” tab in CRIS will look like the following:
.png)
There will be a request for the project number under which this survey was conducted (e.g., consultation project or independent survey project) of type “Request a New Attachment for an Existing Survey” (the request type is displayed in the “Details” column on the far right). It should be noted that this request may not be the top most information request in the grid if other CRIS information requests have been received since the survey was approved.
Click the Edit button for this information request. The information request processing page is displayed.
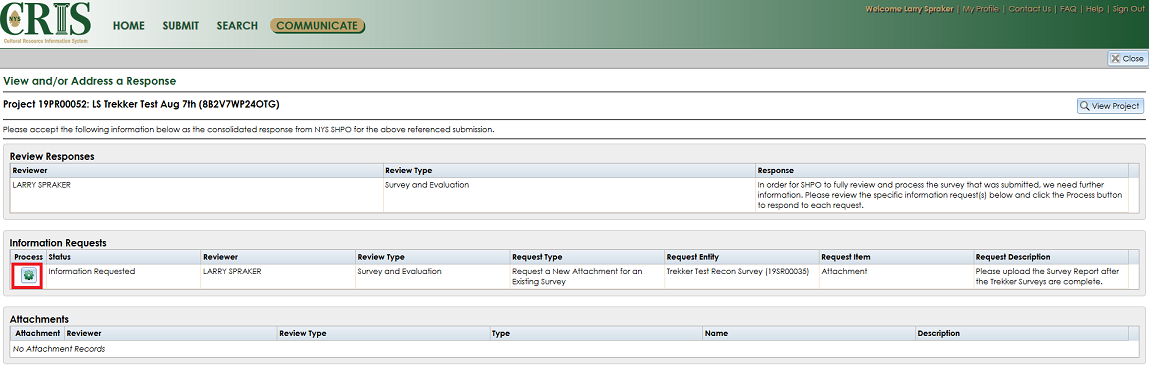
Within the Information Requests section (middle of page), click the Process button in the first column. A dialog is displayed allowing the user to upload one or more attachments (e.g., PDF) that comprise the final survey report (note: if the survey report is larger than 30mb, it is required that it be broken up into several volumes to keep the file size of each PDF reasonable). The Attachment dialog is then displayed.

To upload a PDF file as an attachment to this Trekker Survey, click the Add Attachment button. The Attachment upload dialog is then displayed as shown below.
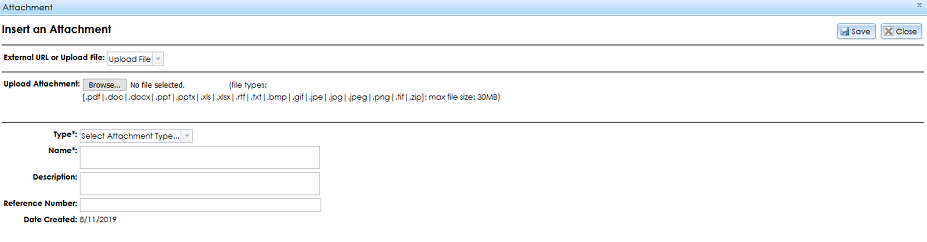
Complete the dialog in the following manner:
From the “External URL or Upload File” picklist, select “Upload File”
Click the Browse… button within the Upload Attachment section. A file open dialog is displayed. Browse to the file to be uploaded and click Open. The file is then uploaded, and a temporary file name is displayed.
From the Type picklist, select “Building Survey Report”
In the Name text box, enter the name of attachment (e.g., Final Survey Report – Volume 1)
Optionally, enter a further description of the document
Optionally, enter a reference number for the document (e.g., an internal ref. number for the survey report to your organization)
Click the Save button
The attachments dialog is displayed again, with the uploaded attachment file shown as a row in the grid.

If there are multiple files to be uploaded for the survey report, click the Add Attachment button and follow the steps above for each file to be uploaded (if the user uploads the wrong file, click the Delete button on the left side of the attachments grid to remove the file so that it is not submitted to CRIS). When all files that comprise the report are added as attachments and uploaded, click the Finished button in the upper right of the dialog. A confirmation dialog is displayed to confirm the user is done adding attachments. The user is returned to initial Information Request dialog indicating that the request for a new attachment is now at “Completed” status.
The user can now close this request dialog by clicking the Close button in the upper right.
Note that the request will still appear in the Information Requests tab since this grid does not automatically refresh. However, if the user clicks the Refresh Grid button, the request will no longer appear.
|