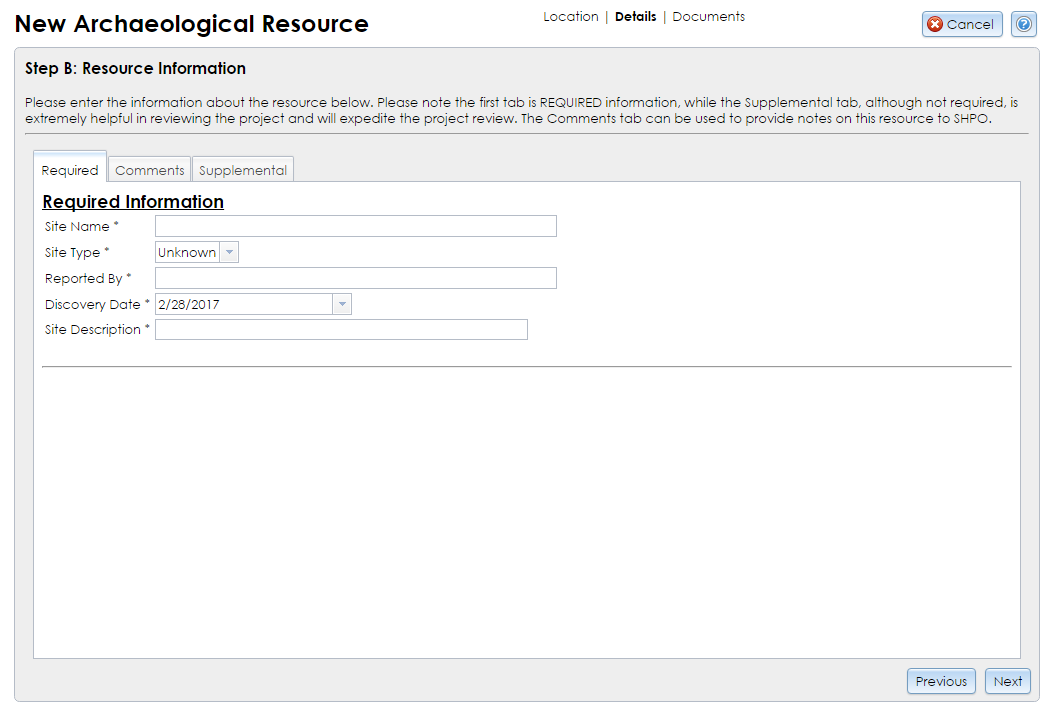
The next step of the Archaeological Site Wizard allows you to enter characteristics and details about the resource. As shown below, there are three tabs in this step: Required, Comments, and Supplemental.
Required
All fields in this tab are required before you may proceed to Step C.
- Site Name: Enter the name for the site. A unique or distinct name is preferred, such as Sheldon Store Historic Site or Blodgett Mills Precontact Site.
- Site Type: Select the site type from the dropdown list. Criteria for site types include the era (precontact or historic) and the presence or absence of human remains.
- Reported By: Enter the name of the person or organization who identified or investigated the site.
- Discovery Date: Enter the date on which the site was discovered. You may either type the date or click the dropdown button and use the calendar tool to select the date. If you do not have an exact date, enter an approximate date.
- Site Description: Enter a summary description of the site’s characteristics, including topography, surroundings, hydrology, and artifacts.
This field is optional. It contains a single text field for adding miscellaneous comments about the site. These comments are sent to SHPO but are not added to the USN record.
Since you are responding to a SHPO request for USN updates, your data will be linked to the USN automatically and you do not need to enter its number here.
You may enter a proposed evaluation of the site’s eligibility for SHPO’s consideration in this field. If you have any other comments about the site that do not correspond to more specific fields in the Required or Supplemental tabs, you may also enter them here.
Supplemental
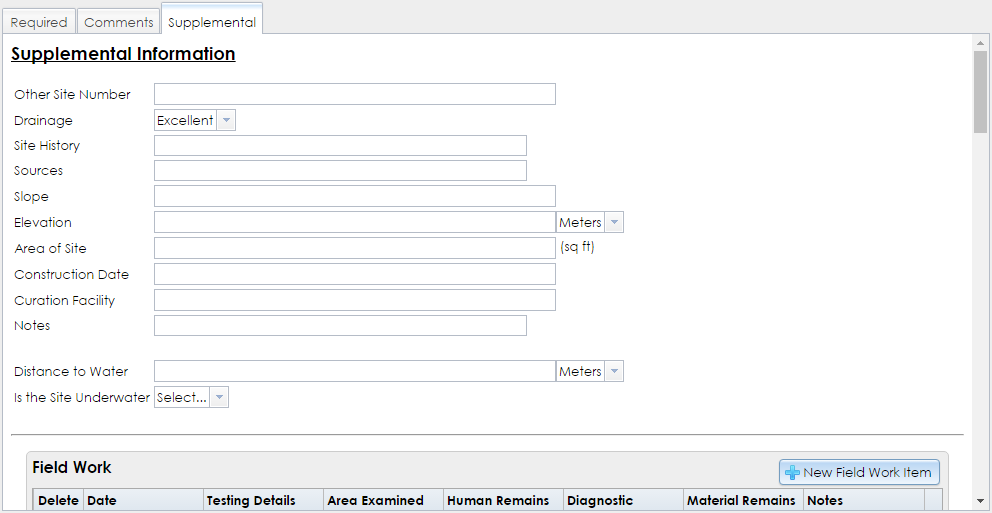
The following fields are not required by the system, but the SHPO Archaeology Unit prefers that you complete as many of them as are applicable. Any information you provide in this tab will make SHPO’s archaeological site inventory more easily searchable and more detailed.
For fields that allow you to select or add more than one entry, you may click the red X button to remove an entry.

- Other Site Number: If the site has an identifier provided by a non-SHPO institution (such as the New York State Museum or a university), enter it here.
- Drainage: Select the soil’s drainage quality from the dropdown list: Excellent, Good, Fair, or Poor.
- Site History: Site investigation history may be entered here, if information on previous archaeological investigations of the site exist.
- Sources: Provide a list of any books, articles, maps or other documents that contain information about the site. For each source, please include author, title, place of publication, publisher, and date of publication when known. Include the name and location of repositories for unpublished materials or hard-to-find publications.
- Slope: Describe the slope of the land encompassing the site.
- Elevation: Enter the elevation of the site and select the appropriate units. Meters are the default.
- Area of Site: Enter the site’s area in square feet.
- Construction Date: If the site includes the remains of a built resource, such as a house or canal lock, enter the exact or approximate date of its construction as free text.
- Curation Facility: If artifacts from the site have been sent to a curation facility, enter the facility’s name and address here.
- Notes: Enter any miscellaneous notes about the site that are not covered by the other fields in Step B.
- Distance to Water: Enter the distance between the site and the nearest body of water and select the appropriate units. Meters are the default.
-
Is the Site Underwater: If the site is underwater, select Yes. This will open the following additional fields.
- Waterway: Name the body of water covering the site. If it does not have a formal name, enter a brief description identifying the body of water.
- Underwater Depth: Enter the depth of water (including units) covering the site as free text.
- Underwater Status: Select whether the site being underwater has been merely Reported or Confirmed.
The following form inputs allow you to add one or more entries to a grid. For inputs that have a dropdown list, select an entry and click the Add (plus sign) button to save it to the site record. Click the Delete (red X) button to remove an entry.
-
Field Work: Click the New Field Work Item button to open the Field Work dialog, which contains the following fields. After you click the Save button, click the Edit button to modify the field work item or click the Close button to return to the Archaeological Site Wizard.
- Date: Required. Enter the date(s) on which the field work was conducted as free text.
- Testing Details: Provide information about the type of field work that was conducted.
- Area Examined (sqft): Enter the area that was examined as part of this field work, in square feet.
- Human Remains: If human remains were identified during this field work, check this box.
- Diagnostic Material: Artifacts or other elements recovered during this field work that identified the site’s time period or cultural context.
- Material Remains: Artifacts or other physical evidence that were recovered during this field work.
- Notes: Any additional information about the field work that is not represented by the other fields in this dialog.
- Current Condition: Select the condition(s) of the site’s current context, such as Wooded, Wetland, or Urban.
- Foundation: If a building or structure foundation is present in the site, select the foundation’s condition, such as Above Ground or Buried Traces Detected. If multiple foundations are present, indicate the conditions for each.
- Geographic Settings: Select the site’s geographic setting(s), such as Coastal or Upland.
- Geomorphic Settings: Select the site’s geomorphic setting(s), such as Floodplain or Esker.
- Stratigraphy: Select the types of evidence identified by the site’s stratigraphy, such as Intact Occupation Floor or Multicomponent.
- Native American Phases: If the site is precontact, select any cultural phases that were identified.
- Native American Traditions: If the site is precontact, select any cultural traditions that were identified.
- Native American Site Types: If the site is precontact, select any uses or forms represented by the site, such as Cave/Rockshelter, Quarry, or Shell Midden.
- Periods: Select any precontact and/or historic periods represented by the site.
- Architects/Builders: If the site includes the remains of built resources whose architects or builders are known, enter each architect, firm, or builder in the text field and click the Add (plus sign) button to add the name to the list.
- Cultural Affiliations: Enter each archaeological or ethnographic culture that contributes to the significance of the resource and click the Add (plus sign) button to add the affiliation to the list.
- Periods of Significance: If the site is National Register–eligible, enter each range of years during which historically significant events or activities occurred at or affected the resource. Click the Add (plus sign) button to add the period of significance to the list.
- Significant Dates: If one or more specific dates are significant in the site’s history, enter each date as text and click the Add (plus sign) button to add the date to the list.
- Significant Persons: If the site is National Register–eligible due to specific people, such as a former owner or occupant, enter each person and click the Add (plus sign) button to add the person to the list.
- Areas of Significance: If the site is National Register–eligible, click the Add Area of Significance button to select one or more areas of significance for the resource. These are listed by the National Park Service in Chapter III, Section 8 of National Register Bulletin 16A, How to Complete the National Register Registration Form. You may use the text field to filter the list. If the area of significance for the resource is not on the list, select OTHER and enter the area of significance. Each area you select will be added to the New Areas of Significance grid on the left. Click the Save button to save the areas of significance to the resource record.
- Current Uses: Click the Add Current Use button to select one or more current uses for the site. These are defined by the National Park Service in Chapter III, Section 6 of National Register Bulletin 16A, How to Complete the National Register Registration Form. You may use the text field to filter the list. If the use type for the resource is not on the list, select OTHER and enter the use type. Each use type you select will be added to the New Current Uses grid on the left. Click the Save button to save the current use(s) to the resource record.
- Historic Uses: Click the Add Historic Use button to select one or more uses for the resource during its period of historic significance. (This is similar to the Current Uses pick list described above.)
After you have entered the required and supplemental information, click the Next button in the lower right corner to proceed to Step C: Attachments. If you wish to return to an earlier step, be sure to click Next to save the current step before clicking Previous to go backward.
Note: If you click the Cancel button in the upper right corner at this step, the information you entered in Step B may not be saved. Proceed through the Archaeological Site Wizard and click the Done button at Step C to save the site information.


