|
The first step in the Trekker workflow is to submit a Trekker Survey proposal to SHPO by completing the on-line submission form available within CRIS. There are two ways to submit a Trekker Survey proposal in CRIS:
1. Independent Survey Project - If a Trekker survey is to be conducted independently (i.e., unrelated to any other project such as a consultation project), the user can choose to submit a New Independent Survey Project, by clicking Submit from the main menu in CRIS, and clicking the icon for Independent Survey. Once the user selects Independent Survey as the submission type in CRIS, a new landing page for Independent Surveys is now available which allows the user to select whether they are submitting a "completed" building or archeology survey (a survey that has already been done), or a Proposal for a new Trekker Survey. The image below illustrates the new Independent Survey landing page. To submit a Proposal for a new Trekker survey as an Independent Survey Project, select the "Trekker Survey Proposal" radio button, and click the "Start" button.
.png)
2. Request for More Information (from an existing project) - Within a consultation project, it is common for SHPO to request that a building survey be conducted for a specified area. SHPO can now specifically request that a "Trekker" survey be conducted which will automatically launch the Trekker Survey Proposal form when the information request is processed by the user in CRIS.
Completing the Trekker Survey Proposal Form
When the Trekker Survey Proposal form launches, it is important to note that it is displayed in a new browser tab (CRIS remains open in the original browser tab).
The form provides a scrollable data entry screen with four (4) sections that allows the external user to submit contact Information, survey details, a survey area boundary and a methodology for the proposed survey. Context sensitive help explaining each section appears along the right side of the panel, while three buttons in the lower right corner (which are always visible) providing the user the following save functions:
Save and Continue – Saves the information entered on the page and allows the user to continue completing the form;
Finish Later – Saves the information entered on the page and exits the form. The user can re-enter the survey form to complete the data entry at a future date; and,
Submit to SHPO – Saves the information entered and submits the proposed Trekker Survey project to SHPO for review.
Section 1 - Contact Information
The first section of the form is for entering contact information. This is the only section that is slightly different between a New Independent Survey project and a Requested Trekker Survey (i.e., request for information).
Requested Trekker Survey
For requested Trekker Surveys, the user starts by entering the contact information for the preparer of the survey. This will default to the information from the profile of the current CRIS user. Since there is an existing CRIS project from which this request for a Trekker Survey was generated, this is the only contact information that is required.
.png)
Independent Survey Project
For an Independent Survey Project, the first section is more general in adding contact information since this will result in a new CRIS project (in addition to the Trekker survey), and there may need to be several contacts listed for project communications. Therefore, the first section displays a grid of project contacts and prompts the user to click the blue button at the top of the grid to Add the Primary contact information. It should be noted that the Primary Contact will be set to the preparer of the survey. The user can then add additional contacts for the project as needed.
.png)
***It is important to note that regardless of the contact information entered, the CRIS user who completes the form and clicks the Submit to SHPO button will be assigned as the initial "Lead" of the Trekker Survey.
Section 2 - Survey Details
In section 2 of the form, the user enters the basic details of the survey.
.png)
•Survey Type (required) - Select the survey type from the dropdown list (Reconnaissance and Intensive surveys are the most common and are defined by the National Park Service in Chapter I of National Register Bulletin 24. A Context Study, which is less common, is a historical overview of the overarching that have shaped land use patterns and development of the built environment).
•Survey Name (required) - Enter a specific name for your survey that will readily distinguish it from other surveys (include the scope or location as well, such as Faust Commercial District Reconnaissance Survey, Village of Tupper Lake, Franklin County, New York).
•Certified Local Government Funded - If the survey was funded by a municipality that is in the Certified Local Government (CLG) program, check the box. If this is not the case, or you are unsure, leave unchecked.
•Sponsor (optional) - If an organization or other party sponsored this survey, enter their name here
Section 3 - Survey Details
The user is required to verbally describe the survey area in the text box at the top, as well as trace the survey area boundary on the map display. Once the survey area description is entered, the user is required to define the survey area on the map by digitizing/tracing the boundary. The detailed help on the right side of the form will assist in the process.
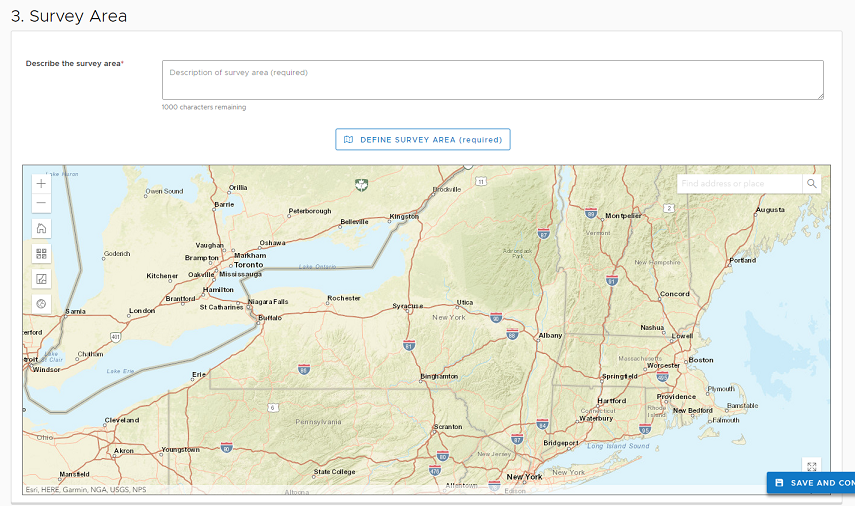
To define the survey area, first zoom the map to the survey area such that you will be able to digitize the boundary accurately (i.e., zoom in close enough to accurately locate the building). If an address, intersection or similar place name is known, enter it into the "Find Address or Place" control in the upper right corner of the map. Also, the Zoom In/Out buttons (Plus and minus) in the upper left corner can be used to zoom the map in and out respectively. Finally, holding the SHIFT key down while dragging a rectangle on the map display with the left mouse button (then releasing the mouse button) zooms to the extent of the rectangle drawn.
Once you have navigated the map to the survey area (at a reasonable level of detail to outline the survey area), click the Define Survey Area button above the map. The tracing tool is activated which will change the cursor, enabling the user to start tracing the boundary. Click each point along the survey area boundary, and when done, double-click the last point on the boundary to complete your shape. Once the survey area has been defined on the map, the area is displayed as a red dashed line, and three new buttons appear above the map, as shown in the image below, allowing the user to:
Zoom to Survey Area – If the user zooms in/out, or pans the map display, this button can be used at any time to zoom back to the extent of the survey area;
Edit Survey Area – This allows the user to modify/reshape the survey area boundary. It is highly recommended that the user clicks the See Shape Editing Tips button on the right to see exactly how to edit the boundary until they fully understand how to edit the survey area.
Delete Survey Area – This allows the user to delete the survey area defined, and trace a new replacement.
.png)
Section 4 - Methodology
This section requires the user to upload one or more attached files (e.g., PDF) that describe the proposed methodology for the survey. At least one attached file is required to be uploaded.
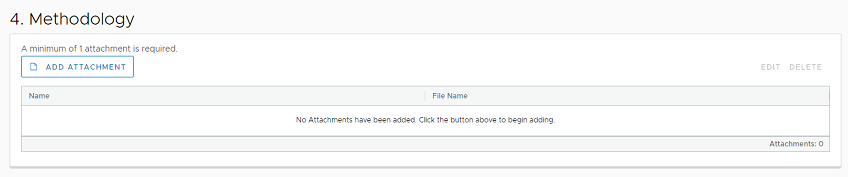
To add a methodology attachment, click the Add Attachment button. The file upload dialog will be displayed as shown below.
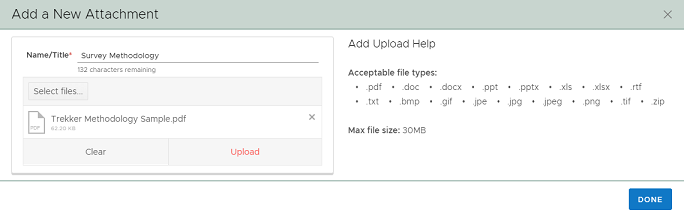
Enter a name for the document in the Name/Title input field (e.g., Methodology Part 1). Next, click the Select files… button which will display a file explorer from which to pick a file. Once a file has been selected it will show in the dialog. Click the Upload button to upload the selected file as an attachment. Once it is complete, click the DONE button in the lower right.
The user is returned to the Trekker Survey Proposal form page where the attachment that was uploaded is displayed in the Methodology grid. If the methodology for the proposed survey spans more than one document, repeat the above process to upload additional attachments.
Submitting the Trekker Survey Proposal to SHPO
Once the Trekker Survey Proposal Form has been completed as described above, click the Submit to SHPO button. The survey project information is submitted to SHPO for review and the confirmation dialog displays as shown below.
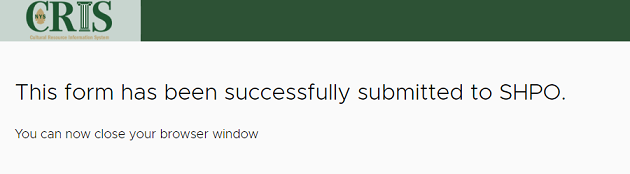
The browser tab that contained the Trekker Survey Proposal form can now be closed (CRIS remained open in the original browser tab).
|